Fennel Pesto on Carrot Salad

I thought of this recipe as a challenge, to myself, to create a dish using parts of vegetables that most people, including me, normally throw away. The other day, I was grilling a bunch of sliced fennel bulbs for a catering event. Typically, when you are cooking with fennel, you cut off the tall stalks and only use the bulb. That’s because the stalk is usually tough and not that exciting to eat. But it still has some of that lovely anise flavor. And with the stalk, most times, the fronds also get thrown out.

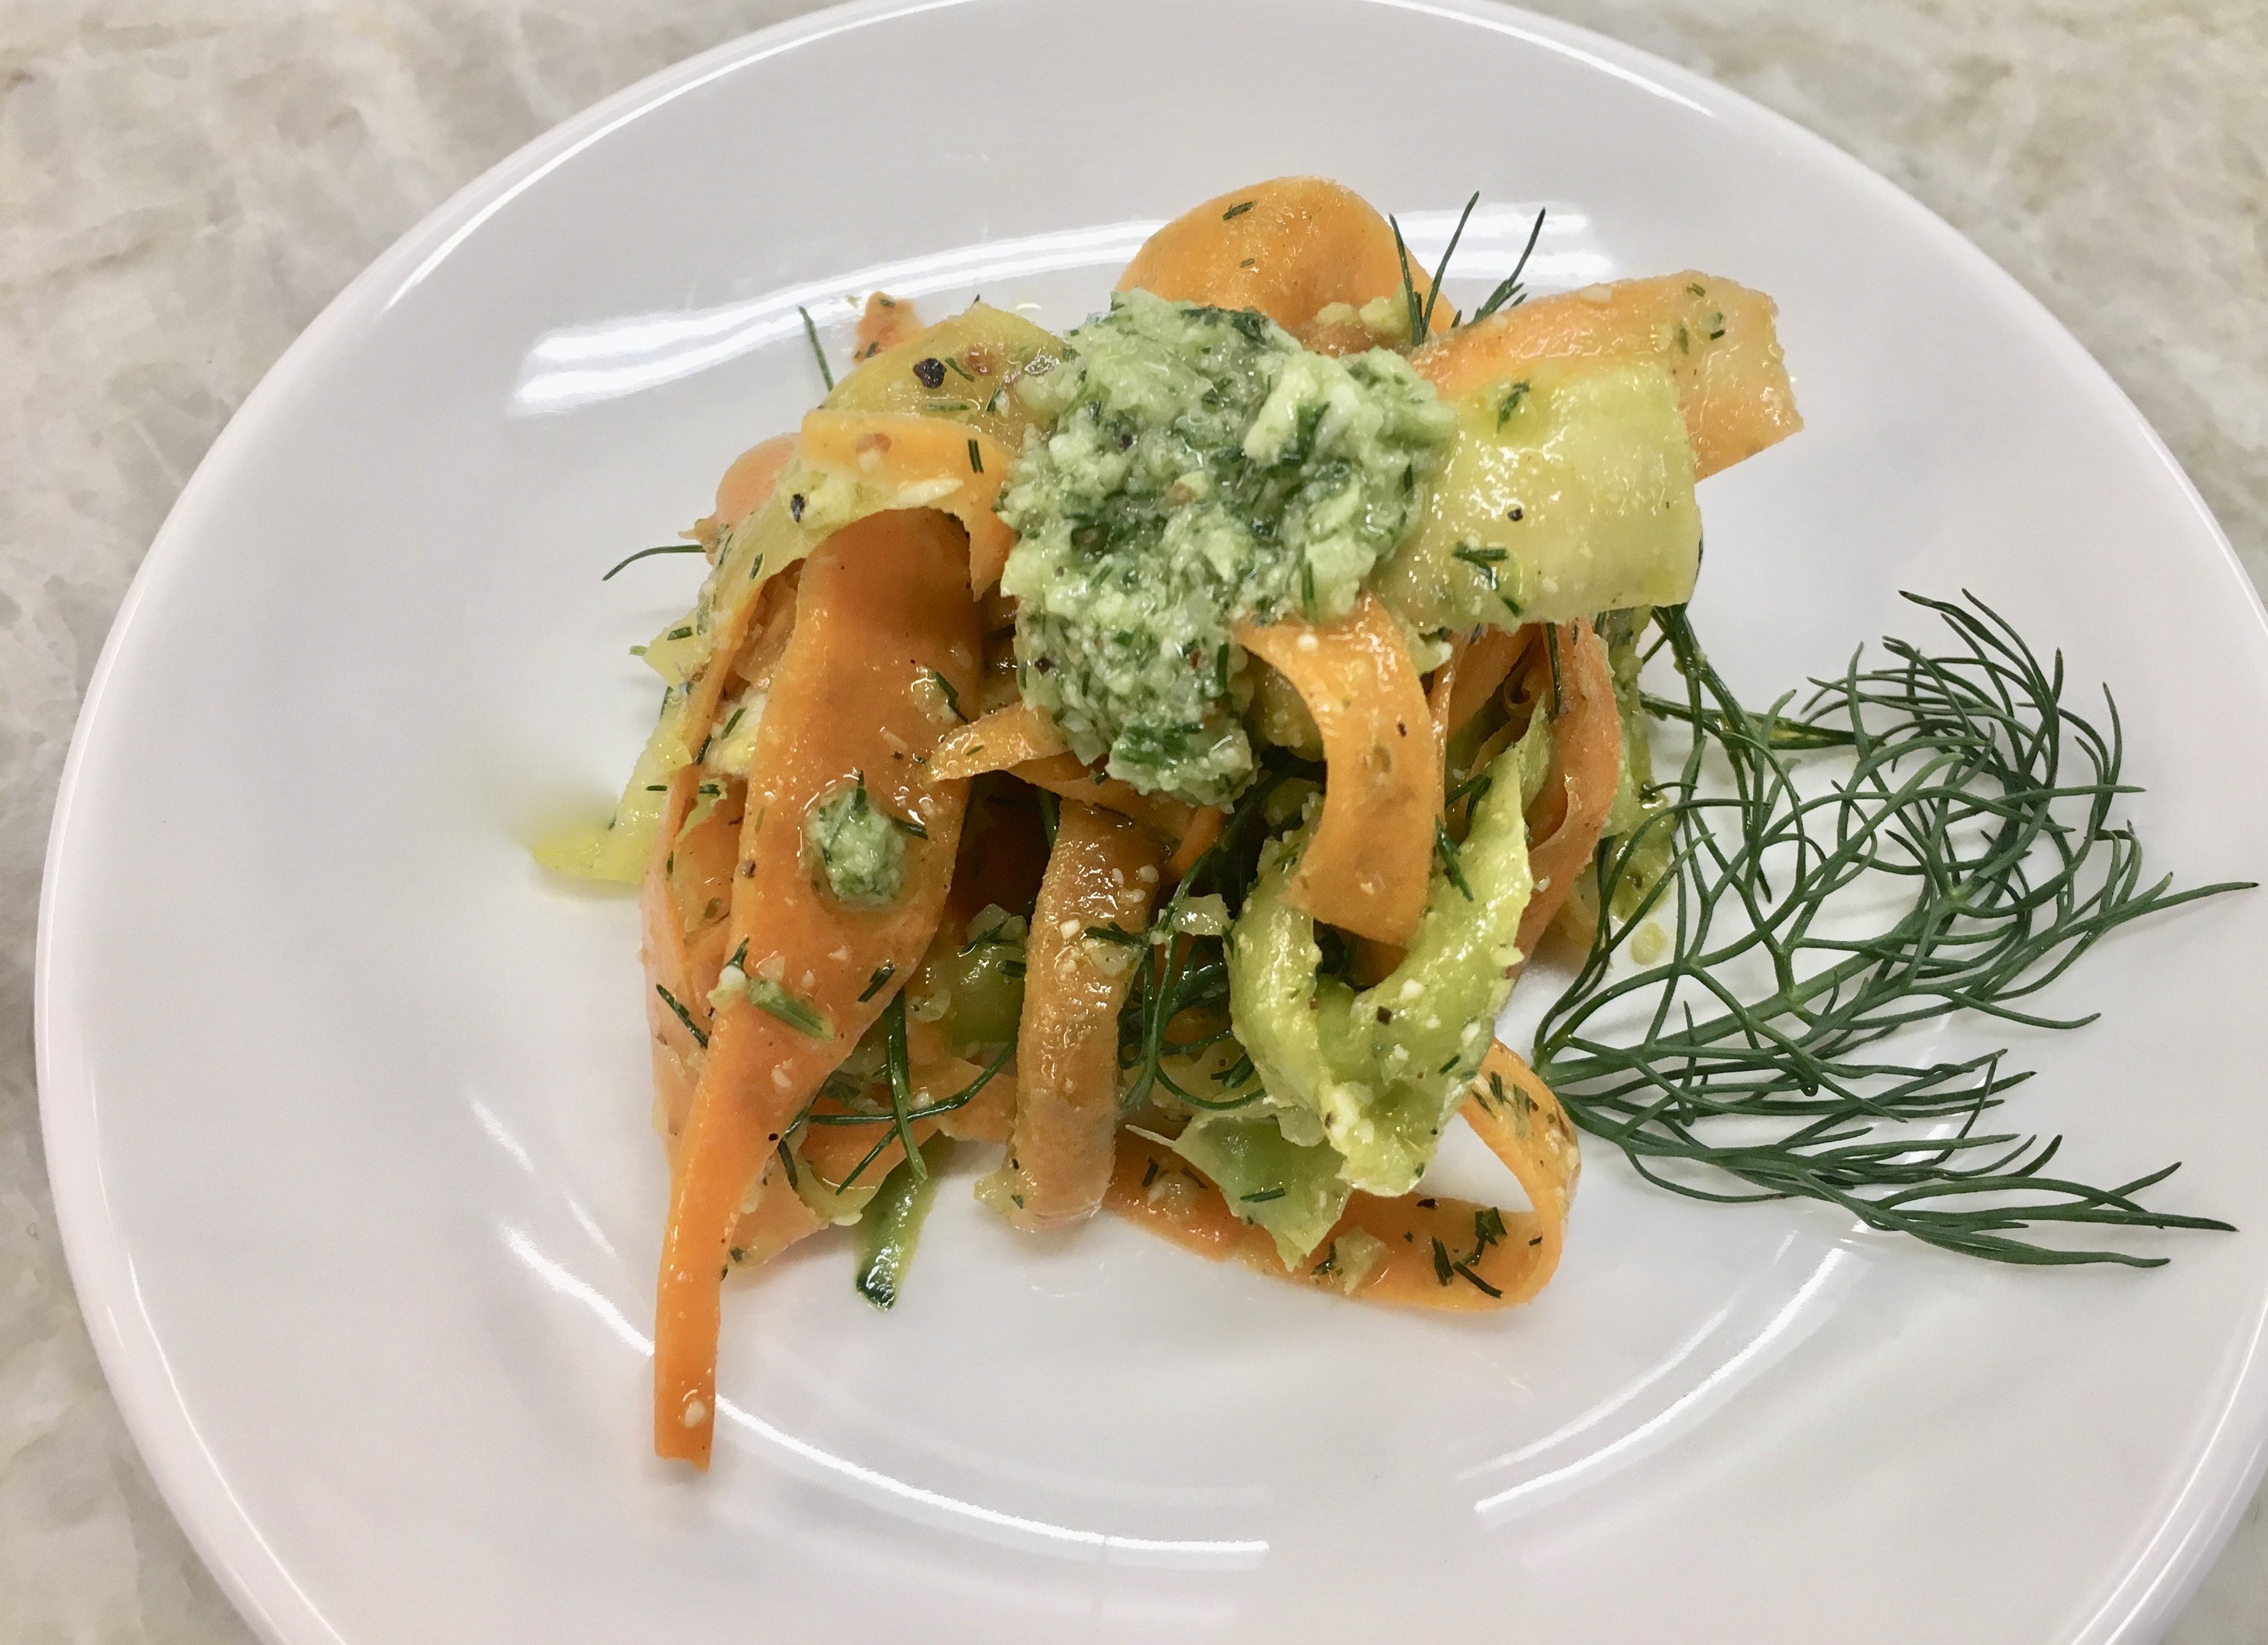
I created this pesto recipe using fennel stalks, fronds (leaves), and a little bit of the bulb. I then made a salad of carrot peels. That’s another part we usually peel and throw away. But the skin of carrots has a great intense flavor and contains concentrated vitamin C and niacin. This pesto is very versatile and can be used on fish, chicken, or pork tenderloin. See the “Variations” section below for more ideas.

You wouldn’t think so, but fennel is actually a member of the carrot family, although it’s not a root vegetable. When a fennel plant goes to seed, it also produces small yellow flowers among the leaves. Every part of it is edible, from the bulb to the flowers, and it can be eaten raw or cooked. It has a fresh licorice flavor. In fact, many supermarkets mistakenly mark fennel as sweet anise.

Fennel is low in calories, but high in fiber and vitamin C, and contains potassium, folate, and vitamin B-6, to name a few.

It’s a great substitute for celery in dishes for an extra depth of flavor.

Serves 4

Difficulty level: easy to medium

Ingredients

  • 2 fennel bulbs – 1 whole, including fronds and stalks, plus only stalks and fronds from a second bulb
  • 2 cloves of garlic
  • 1/2 cup grated parmesan cheese
  • 1/3 cup almonds
  • 1 star anise, soaked in warm water until soft (If you don’t have star anise, or for a more robust licorice flavor, you can add 1 tablespoon of dried fennel seeds.)
  • 1 1/2 cup of extra virgin olive oil
  • zest of 1 lemon, about 1 teaspoon
  • 1 tablespoon lemon juice – or more to taste
  • sea salt and freshly ground black pepper
  • peeled skin of 8 carrots, or 3-4 full carrots including the skin

Instructions

Wash and roughly chop the fennel bulb, stalks, and fronds and add to the food processor. Optional – Save some of the fronds for garnish.

Add the garlic, parmesan cheese, almonds, and star anise, and/or fennel seeds. Pulse until combined.

While the machine is running, slowly add the olive oil until it all comes together and makes a sauce. You may not use all olive oil, or use more, depending on your desired consistency.

Season to taste with salt and pepper. Set aside.

Scrub the carrots clean under running water. Use a vegetable brush if you have one. Since you will be eating the skin, you want to make sure it’s clean!

Peel the carrots and put the skin strips in a salad bowl. If using the whole carrot, continue using the vegetable peeler until all the way through the rest of the “meat” of the carrot.

Toss with some of the pesto until all pieces are covered. Adjust seasoning and add more pesto if needed. Garnish with fronds.

Serve immediately or keep in the refrigerator for up to 1 day. The fennel pesto can be kept in an airtight container for up to 10 days in the refrigerator.

Variations:

  • Use the peel of rainbow carrots for a more colorful salad
  • Use the fennel pesto on sautéed fish, grilled or sautéed chicken, roast pork, grilled or roasted vegetables or grilled sausages.
  • Use as pizza sauce and top with grilled fennel bulb slices, grilled red onions, Italian sausage, and fresh mozzarella cheese
  • Add some to your marinara sauce. The fennel flavor tricks your brain into thinking there is sausage in the sauce!

Do Ahead:

  • The pesto can be made up to 10 days ahead. Keep in an air-tight container and refrigerate.
  • The salad can be made 1 day ahead and refrigerated.
Less food waste by using fennel stalks and carrot peels.

Mediterranean – Tuna Salad #14

I am working on a collection of recipes using canned tun fish. This is recipe #14.

The whole idea came to me years ago when I was trying to put together easy and inexpensive recipes for students going off to college. The finished product was meant to be a cookbook. I went as far as writing down 45-50 recipe ideas using canned tuna fish. Then life happened. I put the list away and didn’t think about it. But about 2-3 years ago, as I was unpacking a box I had in storage, I came across the list! I laughed to myself for my silly idea and threw it away.

Now it’s 2020. We are in quarantine, socially distancing, trying to limit our trips to the grocery store, eating at home more, and trying, probably more than ever, to stay on a budget since none of us knows what’s going to happen next.

And so the 50 canned tuna recipes idea came rushing back to me. I had thrown away my list but I found it pretty easy to start writing down ideas. Because really, tuna is so versatile, but for most of us, the go-to is mayo, celery, and onion. I’m not knocking it. It’s very delicious and I still use that combination all the time, but there are so many other variations. Let me count the ways…

Wondering where are recipes #1-#13 and #15-#50? If they are not already on my blog, it means they’ll be coming soon. The recipe numbers are correlated with my notes when I started writing down ideas. The order in which I post them has to do with what I have at home and what I’m in the mood to taste test that day. I know, very scientific.

Tuna, feta cheese, kalamata olives, green onions, lemon, capers

This Mediterranean version is a great combination of salty and sour, and on the lighter side because there is no mayo. Feta cheese, olives, and capers are naturally salty. And since olives and capers are usually in a brine, they are also slightly sour, and of course a squeeze of lemon brings it all together. Don’t worry about using exact measurements for these recipes. Adjust the ingredients to your taste.

Serves: 2

Difficulty level: Easy peasy

Ingredients:

  • 1 can of tuna – your favorite brand
  • 1 Tablespoon crumbled feta cheese
  • 3-4 Kalamata olives, chopped
  • 1 green onion, sliced thinly
  • a squeeze of lemon
  • 1 tablespoon capers – Capers come in a jar at the grocery store, usually in the same aisle as olives and pickles.
  • drizzle of olive oil
  • freshly ground black pepper to taste

Instructions:

Drain the tuna (Unless it’s packed in olive oil, then don’t drain). Put in a bowl with the rest of the ingredients and mix.

Use your favorite bread to make a sandwich or toss with some lettuce for a carb-free option.

Mediterranean Tuna Salad with Naan

Chicken Tortilla Soup from Your Pantry

I honestly don’t even know if I have ever ordered a chicken tortilla soup at a restaurant, so I just had a vague idea of the ingredients when I started this recipe. But after I got started, I realized it was pretty easy to bring it all together.

Once you try it, I promise it will become one of your go-to recipes for a quick meal that’s hearty, comforting, and healthy. It is loaded with protein (Yes, even the vegetarian version.), fiber, and so many other vitamins and minerals. It has vitamin C, an essential nutrient and antioxidant, potassium that is good for heart disease prevention and blood pressure control, and magnesium; A mineral crucial to body’s function. Like potassium, it keeps blood pressure normal, and also keeps bones strong and heart rhythm steady.

The best part about this recipe is that it’s mostly made with canned goods from your pantry. For ideas on how to have a well-stocked pantry check out my list.

You can watch the full step-by-step video here. Or you can follow the instructions below.

Serves 4-6

Difficulty Level: easy peasy

Ingredients:

  • 1 tablespoon olive oil
  • 1 medium onion, chopped
  • 2 cloves of garlic, chopped
  • 2 tablespoons ground cumin
  • 1 can of chopped, pureed, or whole tomatoes
  • 3 cans of chicken or vegetable stock
  • 1 can of corn, drained
  • 1 can black beans, drained, but not rinsed
  • about 1.5 cups shredded chicken
  • Sea salt and freshly ground black pepper as needed
  • for garnish: tortilla chips or strips, avocado, sour cream, sliced green onions, jalapeños, cilantro, lime wedges

Instructions:

Heat a large stock pot on medium-high heat. Once the pot is hot enough that you can barely touch the sides, add the olive oil.

Add the chopped onions and garlic and sauté until translucent.

Note: I didn’t use fresh garlic in this demo because the jarred tomatoes I was using already had garlic.

Add the cumin and sauté for another minute. Add the tomatoes with the juices from the can, the chicken or vegetable stock, and cook until it comes to a boil.

Once it comes to a boil, turn down the heat to medium-low and using an emersion blender or a Vitamix, puree the soup until smooth and no chunks are left behind.

Turn up the heat back to medium-high and add the corn, black beans, and shredded chicken.

Stir to combine and taste for seasoning. You may not need to add any salt since most of the ingredients are from cans and the pre-roasted chicken is already seasoned.

Adjust seasoning as necessary. Garnish with your favorite toppings and serve immediately.

Variations:

  • Make it vegetarian by using vegetable stock and not adding the shredded chicken.
  • When tomatoes are in season – July to September – use fresh instead of canned
  • Add other favorite canned beans like pinto or garbanzo beans
  • Although not traditional, you can make it creamy by adding 1/4 cup of whipping cream or creme fraiche.
  • Make it into a tomato-basil soup! After pureeing, add some pesto sauce. Start with 1 tablespoon. You can always add more. Omit the corn and the beans. Add chicken and garnish with small fresh mozzarella balls.

Do Ahead:

This recipe is easy and quick enough that there is not really a need for do ahead tips. But if you do have leftovers, I can tell you that it will taste even better the next day. It also freezes very well.

If you are making the soup before you intend to eat it, I would leave it at the pureed stage and not add the rest of the ingredients. When ready to eat, bring the pureed soup to a boil, then add the corn, beans, and chicken. Adjust seasoning and enjoy!


Basic Herbed Focaccia Bread

Learning to make focaccia bread is a great way to get started in your bread-making adventure. It has less fuss and muss compared to making for example a baguette. And you still get the satisfaction of enjoying warm, fresh-baked bread right out of the oven. What’s better than that?

The ingredients are simple and mostly from your pantry.

You can watch the full step-by-step video here

Or you can follow the instructions below.

Makes 1 Focaccia

Difficulty Level: medium

Ingredients

  • 1 packet or 1 tablespoon Active Dry yeast
  • 1 Tablespoon sugar
  • 1 cup warm water about 110-115 degrees
  • 3 large garlic cloves, minced
  • 2 teaspoons dried thyme
  • 1/4 cup olive oil (plus another 1/4 cup more for coating the dough while rising and for drizzling on top)
  • 1 teaspoon fine sea salt
  • 3 1/2 cups all-purpose flour or bread flour
  • 1 Tablespoons coarse sea salt for topping

Instructions

Proof the yeast by stirring together the yeast, sugar, and warm water in the bowl of an electric mixer. If you don’t have a mixer, no worries. Just mix the ingredients in a glass or stainless steel bowl.

Let sit for about 10 minutes or until fluffy. This step insures that your yeast is active.

Quick tip: Store your yeast in the freezer. It will last longer than its expiration date, but you should still proof it to make sure it’s active.

Add in the thyme, minced garlic, 1/4 cup of olive oil, sea salt, and flour.

Quick tip: The ratio for fresh herbs versus dried herbs is 3:1. So if I was using fresh thyme I would need 6 teaspoons, (equal to 3 tablespoons) instead of 2 teaspoons.

Using the dough hook on your mixer, mix the ingredients on low until the dough starts to come together, about 2-3 minutes.

Increase the speed to medium and mix until the dough comes away from the sides of the bowl, about another 5-6 minutes or until the dough is elastic and will not tear easily when pulled. If kneading by hand, it will take about 10-12 minutes of kneading time.

Drizzle about 1 tablespoon of olive oil on top of dough and turn to cover all sides . Cover the bowl with plastic wrap and place in a warm, draft free place until the dough doubles in size, about 1 1/2 hours.

Punch down the dough to redistribute the yeast. “Punch down” is just a term used; don’t take it literally. Instead, gently fold over the dough and press down a few times.

Grease a half baking sheet pan (17 by 12-inch) and transfer the dough onto the baking sheet. I like to make a rustic shape in the middle, leaving a few inches off each side. This will give me enough thickness after it’s baked to cut in half and make a sandwich. You can also stretch the dough to fit the pan for a thinner finished bread.

Lightly cover the pan with plastic wrap and let the dough rest for 1 hour. Start preheating the oven to 350 degrees Fahrenheit half way through this resting period.

Now is the fun part! With your fingertips, press down on the dough to make little indents. I love this part!

Drizzle or brush the top with olive oil and sprinkle generously with the coarse sea salt.

Bake for 25 to 30 minutes or until the crust is golden brown . Enjoy!

Herbed Focaccia bread with olive oil/balsamic vinegar dipping sauce

Variations:

  • I used dried thyme because it was what I had on hand, but you can substitute with fresh herbs such as rosemary, a very classic herb for focaccia. You can use pretty much any herb you like. See the “quick note” above regarding the ratio of fresh versus dried herbs.
  • Add raisins or other dried fruit to the dough.
  • Top with caramelized onions
  • Mix in about 1/4 cup roughly chopped Kalamata olives in the dough, and about 1/4 cup sprinkled on top
  • Drizzle truffle oil on top
Fresh Rosemary Focaccia
Clockwise from left: Herb de Provence cream cheese with fresh tomato slice, Turkey Sandwich with tomatoes, onions, & Spring mix, Salami and Havarti Cheese Sandwich
With pesto and balsamic dipping sauce

Do Ahead:

There isn’t much you can do ahead of time for this one. But, you can slow down the rising process of the dough by putting it in the refrigerator. This will slow it down by 2-3 hours.


Cranberry & Goat Cheese Tart

I was invited to an outdoor potluck picnic in the Santa Cruz mountains a couple of weeks ago. The spot was so beautiful and rustic with tall trees and an ocean view in the distance. Gorgeous!

I wanted to bring something delicious of course, but also something to match the rustic atmosphere. Also I didn’t want something that needed to be heated or kept cold. So I looked in my refrigerator to see what I had on hand and decided on this cranberry and goat cheese tart.

The flavor combinations of this tart are so complex – sweet from the cranberry chutney, tangy from the goat cheese, and peppery from the arugula on a crispy, flaky puff pasty dough – it’s hard to believe how easy it is to make. And with only 4 ingredients! (If you don’t count the flour for the work surface.)

Serves: 4-6 as an appetizer

Difficulty Level: So easy

Ingredients

  • 1 sheet puff pastry
  • about 3/4 cup cranberry chutney
  • 8 oz of goat cheese
  • 2 hand fulls of arugula

Instructions

Preheat oven to 375 degrees.

Flour your work surface and roll out the puff pastry sheet until it’s about 2 inches wider on each side.

Use parchment paper or aluminum foil to cover a sheet pan for easy clean up later, but totally not necessary. The puff pastry has enough butter on it’s own that it wont stick to the pan.

Before adding toppings, put the rolled out pastry sheet on the sheet pan. Something I didn’t do and it was not fun to move after it had all the toppings.

Spread the cranberry chutney on top, leaving a one-inch border.

Top with pieces of crumbled goat cheese.

Bake in the preheated oven for about 20-25 minutes or until the edges are golden brown.

As soon as you take it out of the oven, top with the arugula. I love having the arugula warm up and wilt a little before serving.

Let rest for about 5-10 minutes before serving. Just that easy!

Variations:

  • make them into bite-sized hors d’ oeuvres. After adding the goat cheese, add the arugula and roll as tight as you can. Cut into 1-1.5″ pieces, lay them flat, and bake on a baking sheet. The oven temperature and time area about the same as the whole tart.
  • Use mango chutney instead of cranberry.
  • Use Feat cheese instead of goat cheese.
  • Add chopped walnuts or pine nuts.

Do Ahead:

  • Assemble up to the point of baking. Wrap with saran wrap and refrigerate up to one day ahead.

Spicy Thai Green Curry Beef with Eggplant

The ideal Thai dish will have a harmonious balance of sweet, salty, spicy, and sour. That’s why it’s so satisfying to eat. And I am guessing you love happy tastebuds as well since you are looking at this recipe.

I also love cooking Thai dishes because usually it’s quick and fairly easy. The other plus is that you can do almost all the prep ahead of time so when it’s time to make dinner, it will take just a few minutes. I have some suggestions for you at the end of the recipe under the Do Ahead section.

I gave this recipe a rating of easy because really – it is pretty easy to make. But then I added intermediate because some of the ingredients may require some searching at the grocery store or going to a specialty store.

Thank you to my friends – Alex for cooking with me, and Goody for video taping.

Serves 4          Difficulty Level: easy to intermediate

  • 3-4 tablespoons vegetable oil
  • 1 pound sirloin steak, cut into thin, bite-sized strips
  • ½ pound Japanese eggplants, about 2, sliced on the bias
  • 1-2 tablespoons of green curry paste (recipe follows, or use store-bought)
  • 2 ½ cups coconut milk
  • 4 kaffir lime leaves, chopped
  • 1-2 tablespoons fish sauce
  • 1 teaspoon palm sugar (or granulated sugar)
  • A handful of Thai basil leaves
  • 2 Thai chilies, sliced thinly for garnish

Heat some oil in a large sauté pan or wok. Add the sliced beef and sauté, stirring frequently, until the beef is almost cooked, about 2-3 minutes. Remove from pan and set aside for later.

Next, add more oil if necessary (Enough to cover the whole surface of the pan.) Sauté the sliced eggplants until brown on both sides, stirring frequently. Remove from pan and add to the cooked beef.

Heat about 2 tablespoons oil in the same pan. Add 1 tablespoon green curry paste and fry until fragrant. Stir in half of the coconut milk and stir. Cook for about 5-6 minutes, until an oily sheen appears.

Add the kaffir lime leaves, fish sauce, and sugar. Stir in the remaining coconut milk. Bring back to a simmer and add the sautéed eggplants and beef and heat through. Taste and adjust seasoning if necessary. Add the Thai basil leaves just before serving. Garnish with Thai chilies. Serve warm with rice.

Green Curry Paste

  • 15 Thai chilies
  • 2 lemongrass stalks, chopped
  • 3 shallots, sliced
  • 2 garlic cloves
  • 1 tablespoon chopped galangal
  • 4 kaffir lime leaves, chopped
  • ½ teaspoon lime zest
  • 1 teaspoon chopped cilantro root (or 1 tablespoon chopped cilantro leaves)
  • 6 black peppercorns
  • 1 teaspoon coriander seeds, toasted
  • 1 teaspoon cumin seeds, toasted
  • 1 tablespoon sugar
  • 1 teaspoon salt
  • 1 teaspoon shrimp paste (optional)
  • 2 tablespoons vegetable oil

Combine all the ingredients together thoroughly in a mortar and pestle or in a food processor until smooth. Add the oil, a little at a time, and blend well between each addition. Makes about 1 cup.

Leftover curry paste can be stored in an airtight container in the refrigerator for up to 2 weeks.

Variations:

  • To make it vegetarian or vegan, you can omit the fish paste in the curry paste and use soy sauce instead of fish sauce.
  • Use other vegetables like bell peppers, carrots, bok choy, broccoli, zucchini, or cauliflower.
  • Make it lighter, by using light coconut cream
  • Serve with white rice, brown rice, noodles, quinoa, faro, or other grains

Do Ahead:

  • Make the curry coconut sauce up to 5 days ahead. Sauté the beef and eggplants when ready to eat and combine with the sauce.
  • Mise en place (A method of preparing and organizing ingredients before you start cooking.) all the ingredients, except the eggplant up to 3 days in advance. Eggplant can be sliced one day ahead.


Turkey Bolognese


This is an old video from 2009!

Does anyone remember this show? Unfortunately, it’s not on anymore, but it was a local weekday variety show on ABC called The View From the Bay, hosted by Spencer Christian and Janelle Wang. It was a live show that featured Bay Area attractions and interviews and also had a cooking segment every day. I had the pleasure of doing the cooking segments a total of five times!

VFTB 2

Did I mention it was live? Yikes!

VFTB 3

This one was about putting a twist on a recipe that a viewer had submitted. Her recipe was Turkey Bolognese. I wanted to keep the integrity of her recipe and didn’t want to change it too much. So my twist was adding some pesto sauce and making it into lasagna rolls instead of a traditional layered lasagna.

The recipe is in the video. Leave a comment if you have any questions or if you want more detail. It’s been 9 years so I may need to make a couple of adjustments. Please also see below for Variations and Do Ahead.

I had so much fun doing this show. I hope you enjoy watching it.

VFTB 4

Variations:

  • You can make the sauce the traditional way with a combination of ground beed and pork for a more robust flavor.
  • Use the sauce for regular spaghetti or any shape noodle you like.
  • Make a layered lasagna.
  • Add some grilled and chopped zucchini or eggplant to the sauce. If making a layered lasagna, I recommend keeping the vegetables in slices (not chopped) and layer with the sauce, cheese, and noodles.

Do Ahead:

  • Make the sauce and keep in the refrigerator for 5 days.
  • The sauce also freezes well. Make a double batch and freeze for that rainy day – literally – for the day that is pouring rain and you don’t feel like stopping at the store.
  • The rolls or the layered lasagna can stay in the refrigerator for about 3-4 days. When ready to eat, just add some cheese on top and bake in the oven as normal.


Caesar Salad In a Glass – No Forks Needed!


Makes 1 cup of dressing          Difficulty Level: Easy +

Dressing

  • ½ teaspoon anchovy paste – can be found at grocery stores, usually in the canned tuna isle
  • 1 clove of garlic, minced
  • 1 teaspoon sea salt
  • ½ teaspoon freshly ground black pepper
  • 1-2 tablespoon mayonnaise
  • ¼ teaspoon Worcestershire sauce
  • ¼ cup lemon juice
  • ¾ cup olive oil

Salad

  • Romaine lettuce hearts – see below notes for amount
  • 1/3 of a Baguette
  • olive oil for brushing
  • 1 clove of garlic, cut in half
  • Parmigiano Reggiano, about 2 ounces or 1/3 cup

Notes:

  • You typically will use more dressing if making individual servings. If making a full salad in a bowl, you most likely will not use all the dressing.
  • The same is true with romaine lettuce. You will need about 3-4 hearts to make about 6-8 individual servings because you will use just the smaller leaves in the center. If making a full salad in a bowl, about 2 romaine hearts will serve 3-4 people as a side salad.
  • Classic Caesar dressing is made with anchovy filets, mashed with a fork. It also does not have mayonnaise. The creaminess comes from a raw egg yolk.

Caesar salad at Amy's

Instructions:

Put all ingredients except the olive oil in a small bowl and whisk together until well combined. Drizzle the olive oil in a steady but slow stream while whisking constantly. This will help emulsify the dressing.

Alternatively, put all ingredients in a mason jar, cover with the lid and shake vigorously until all ingredients are combined.

Wash and separate the lettuce leave, using only the smaller leaves that will fit in your individual serving dish.

Slice the baguette in exaggerated bias cuts. Brush one side with a little olive oil and toast in the toaster until crunchy. Alternatively, toast them in a 375° oven for about 3-4 minutes.

Once cool enough to handle, rub the oiled side of each slice with the glove of garlic. Remember, don’t go crazy! You just need to 2-3 strokes.

To assemble your individual salads, place about 1 tablespoon of dressing on the bottom. Pick 2-3 of the best leaves for each serving dish and dip the bottom in the dressing.

Put one slice of toasted baguette in each dish, and finish with some grated or shaved Parmigiano Reggiano.

Variations:

  • As mentioned before, you can use this recipe and make a full salad in a bowl. You can still make the “croutons” the same way as described above and just crumble them into pieces in your salad
  • Add a cut piece of grilled chicken breast for each serving.

Do Ahead:

  • The dressing can be made up to 7-8 days ahead. In fact, when you are making it, why not make a double batch. That way you have fresh salad dressing all week.
  • The lettuce can be washed, and leaves separated one day ahead. To keep them crisp, loosely wrap the leaves in a damp paper towel, put in a plastic bag and keep in the fridge. Do not close the top of the bag. Give the lettuce a chance to breathe.
  • The croutons can be made up to one day ahead. If they get stale, pop them in the toaster to reheat.


Easy Thai Pork Skewers (Moo Ping)

Thai is one of my favorite cuisines to eat and to cook. I love all the spices and the fresh ingredients used to create deliciously fragrant and quick meals. And I love spicy! This one here is perfect for a quick weeknight meal or a lazy Sunday lunch. And if you have not tried Thai cooking before, do not be intimidated! This recipe is super easy and a great way to get you on your way to try more Thai dishes.

The video has a quick overview of the recipe at the beginning, but I encourage you to watch the entire thing to learn some great tips like how to tell your steak is cooked to your desired doneness just by touch.

Thank you to my friend Alex for cooking with me. We had so much fun.

The recipe and instructions follow below and per usual Variations, and Do Ahead are included at the end of the recipe. Enjoy!

Makes 8 skewers          Difficulty level: easy peasy

Ingredients:

  • 3/4 pound ground pork
  • 4 garlic cloves, crushed and minced
  • 1 cup cilantro , chopped (I don’t use cilantro in the video. I decided to add some later for more flavor.
  • 1/2 teaspoon sugar
  • 1 tablespoon soy sauce
  • sea salt and freshly ground pepper to taste
  • 8 lemongrass stocks, trimmed and slightly bruised
  • Sweet chili sauce to serve

Instructions:

Place the ground pork, crushed garlic, chopped cilantro, sugar, and soy sauce in a bowl. Season with salt and pepper to taste and mix well.

Divide into 8 portions and mold each one into a ball. It may help to dampen your hands before shaping the mixture to prevent sticking.

Stick a length of lemongrass halfway into each ball, then press the meat mixture around the lemongrass to make an elongated meatball shape.

Cook the pork sticks on a hot grill (or under the broiler) for 3-4 minutes on each side or until cooked through. Serve with the chili sauce for dipping.

Variations:

  • You can use ground beef, ground turkey, or a combination
  • Serve with steamed jasmine rice
  • Add a tablespoon of grated ginger to the pork mixture

Do Ahead:

The ground pork mixture can be made 1 day ahead and refrigerated.


Pesto – Tuna Salad #2

I am working on a collection of recipes using canned tun fish. This is recipe #2.

The whole idea came to me years ago when I was trying to put together easy and inexpensive recipes for students going off to college. The finished product was meant to be a cookbook. I went as far as writing down 45-50 recipe ideas using canned tuna fish. Then life happened. I put the list away and didn’t think about it. but about 2-3 years ago, as I was unpacking a box I had in storage, I came across the list! I laughed to myself for my silly idea and threw it away.

Now it’s 2020. We are in quarantine, socially distancing, trying to limit our trips to the grocery store, eating at home more, and trying, probably more than ever, to stay on a budget since none of us knows what’s going to happen next.

And so the 50 canned tuna recipes idea came rushing back to me. I had thrown away my list but I found it pretty easy to start writing down ideas. Because really, tuna is so versatile, but for most of us, the go-to is mayo, celery, and onion. I’m not knocking it. It’s very delicious and I still use that combination all the time, but there are so many other variations. Let me count the ways…

Wondering where are recipes #1 and #3-#50? If they are not already on my blog, it means they’ll be coming soon. The recipe numbers are correlated with my notes when I started writing down ideas. The order in which I post them has to do with what I have at home and what I’m in the mood to taste test that day. I know, very scientific.

Tuna, Pesto, Red Onions, Toasted Pine Nuts

Pesto adds a fresh basil and garlic flavor, and the pine nuts add a nice crunch. Just make sure to toast them first. Use a dry saute pan on medium heat, add the pine nuts and shake occasionally to toast evenly. Do not leave them! They can burn pretty easily. Just stay close by and keep shaking the pan until they are a nice golden brown color. Why toast them first? Because it enhances the nutty flavor and the aroma.

And don’t worry about using exact measurements for these recipes. Adjust the ingredients to your taste.

Serves: 2

Difficulty level: Easy peasy

Ingredients:

  • 1 can of tuna – your favorite brand
  • 1 Tablespoon toasted pine nuts
  • 1- 1 1/2 Tablespoons red onion, chopped (Click for a quick video on how to chop onions.)
  • 1 green onion, sliced thinly
  • 3 Tablespoons homemade or store-bought pesto. You can add more for a greener look. I was being calorie-conscious.
  • Freshly ground black pepper to taste

Instructions:

Drain the tuna. Put in a bowl with the rest of the ingredients and mix.

Use your favorite bread to make a sandwich or toss with some lettuce for a carb-free option.

Pesto & Pine Nut Tuna Salad


A Well Stocked Pantry

Do you have a well-stocked pantry? Do you wonder what is a well-stocked pantry?

I don’t believe there is one list that can fit for every household. But I have put together a general top 10 list to help you get started. Using my list as a guideline, create your own based on your taste, things you enjoy eating, and dietary preferences and restrictions. Please note that I am not suggesting you buy everything I have listed under each of the 10 categories. I am only including examples to get your creative juices flowing.

The criteria I used for this list was based on long shelf life, versatility, availability, and affordability.

Here are my top 10 essential, non-perishable, pantry items.

1. Grains – rice, quinoa, barley, farro, bulgar, etc.

Long Grain Rice, Black Rice, Quinoa, Farro

2. Pasta & Noodles – spaghetti, orzo, bowtie, fusilli, couscous (Yes! couscous is not a grain as it is commonly thought. It is actually a pasta made with flour), rice noodles, soba noodles, other Asian noodles

Pearl Couscous, Penne Pasta, Egg Noodle Pasta, Fusili, Elbow Macaroni, Dry Ramen Noodles, Spaghetti, Green Tea Soba Noodles, Buckwheat Soba Noodles

3. Canned or Dried Legumes – pinto beans, black beans, red kidney beans, garbanzo beans, white beans, lentils, black eyed peas

Split Peas, Garbanzo Beans, Black Eyed Peas, Red Lentil

4. Broth in Can or Carton – I always have at least chicken broth, but you can get vegetable, beef, lamb, fish, or even turkey broth at most stores. My favorite brand is Swanson, low-sodium. I’m not on a low-sodium diet, but I like to be in control of the amount of seasoning in my food. I like Swanson brand because it has the least amount of additives. Other brands usually have other flavorings added. Some also have turmeric added for color. I love turmeric, but I may not necessarily want it in the dish I am cooking. Again, it’s all about being in control of what goes into my dish.

There are some premium brands available at specialty stores, but I was going for availability and affordability.

Concentrated Chicken Stock Packets, Swanson Chicken Broth

5. Canned Tomatoes – You can use it in sauces, soups, and stews to name a few. Chopped tomatoes are most versatile, but anything on hand will work.

6. Jarred Pasta Sauce – Of course homemade is better, but I always keep a jar in my pantry. It comes in handy for a quick meal. My go-to is Trader Joe’s brand, pardon me, I mean Trader Giotto’s, Tomato-Basil. Marinara. At less than $2.00 per jar, it is a steal!

7. Oils, Vinegars, & Soy Sauce – Olive oil, vegetable oil, sesame oil, red wine vinegar, apple cider vinegar, balsamic vinegar, and of course soy sauce to name a few.

Rice Vinegar, unseasoned, Balsamic Vinegar, Avocado Oil, Olive Oil, Sesame Oil, Apple Cider Vinegar, Ginger Pear Rice Vinegar, Walnut Champagne Vinegar, Raspberry Vinegar

8. Salt, Pepper, Dried Herbs – thyme, cumin, paprika, chili flakes, cinnamon, oregano, basil. If you have these basics, you can enhance the flavor in so many dishes.

Ground Cumin, Cinnamon Sticks, Smoked Paprika, Whole Nutmeg, Oregano, Pepper Corns,
Bay Leaf, Turmeric, Dried Thyme, Red Pepper Flakes

A note about dried herbs and spices; there are many guidelines for how long they’ll keep. Some say six months, some say three. Similar to recipes, these are just guidelines, so you should use your own judgment. If you open a jar and it still smells like what it’s suppose to, you are good to go. If it doesn’t smell like anything, then how is it going to add any flavor to your dish? If it has lost its aroma, then it’s time to toss it in the garbage and get a new jar.

If you can, buy whole spices and grind them as needed. Whole spices have a very long shelf life. I’m talking years!

9. Canned Vegetables – I usually don’t have a big variety of canned vegetables on hand. I find the texture of most canned vegetables not to my liking. They can be too soft, like caned green beans. Ugh! I can’t stand them!

But I will buy canned or jarred artichokes, plain or marinated. I also like adding corn to my Chicken Tortilla Soup, so I will keep a can or two on hand when corn is not in season. And of course black olives! They are technically a fruit, like tomatoes, but in culinary terms, they are considered a vegetable.

Black Olives, Grilled and Marinated Artichoke Hearts, Canned Artichoke Hearts

10. Flour, Sugar, & Breadcrumbs – Even if you are not a baker, it’s good to keep some flour and sugar on hand. Flour is helpful for thickening sauces, soups, and stews. It is also good for coating your protein if you want to sauté – for example, dusting your chicken breast with flour to give it a nice golden brown color, which will also help thicken your pan sauce after the chicken is cooked. But that’s a whole other blog subject for another time coming soon!

Sugar is used to balance flavors, especially in Asian cooking. And breadcrumbs help give texture to things like meatloaf and crab cakes. And of course to get that yummy crispy coating when pan frying.

All-Purpose Flour, Plain Bread Crumbs, Panko Bread Crumbs, Brown Sugar, Granulated Sugar

Now that you are well stocked, lets put your pantry to good use!

For a quick recipe using some of these panty items, see my post Chicken Tortilla Soup from Your Pantry.